Week 4 - Section 1 - Graphics
| Site: | ΕΛ/ΛΑΚ Moodle |
| Course: | Python Lab - May 2017 |
| Book: | Week 4 - Section 1 - Graphics |
| Printed by: | Guest user |
| Date: | Monday, 29 June 2026, 7:14 AM |
Description
In this section we will learn about Graphics
Chapter 6.1 - Graphics
6.1 - Graphics
Open the Basic Pygame Template file (click here if you haven't saved it).
If you can't remember what is the purpose of every command go back to Chapter 4.8 and review.
Around line 43 there is a command to fill the background with WHITE color. Change this line so the background is BLACK and run the code to see the difference. (you should change the line to screen.fill(BLACK) )
Now between lines 45 and 47 we will write code to create a WHITE rectangle. In line 46 write
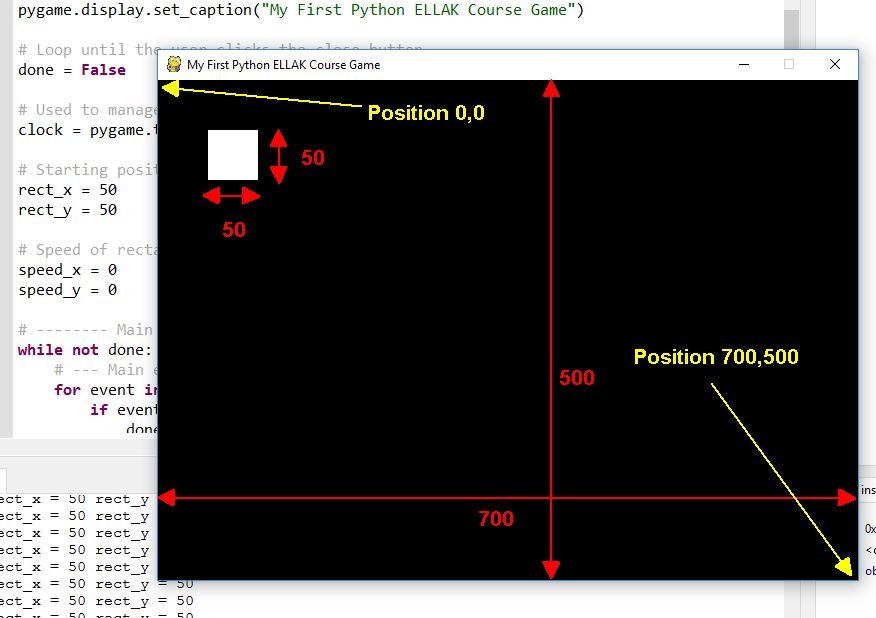
pygame.draw.rect(screen, WHITE, [50, 50, 50, 50])
Pygame is the library, draw is a method, rect (for rectangle) is a type, screen is where to draw the first two numbers is the top left coordinates and the second two numbers are the width and height. You can experiment changing these numbers (consider that your screen is 700 x 500) and the color to one of the previously defined.
You can view what other shapes you can draw here
Try to draw another shape. This time draw a circle
If you didn't succeed try the following line :
pygame.draw.circle(screen, RED, [200, 140], 30)
[200, 140] is the center of the circle and 30 its radious.
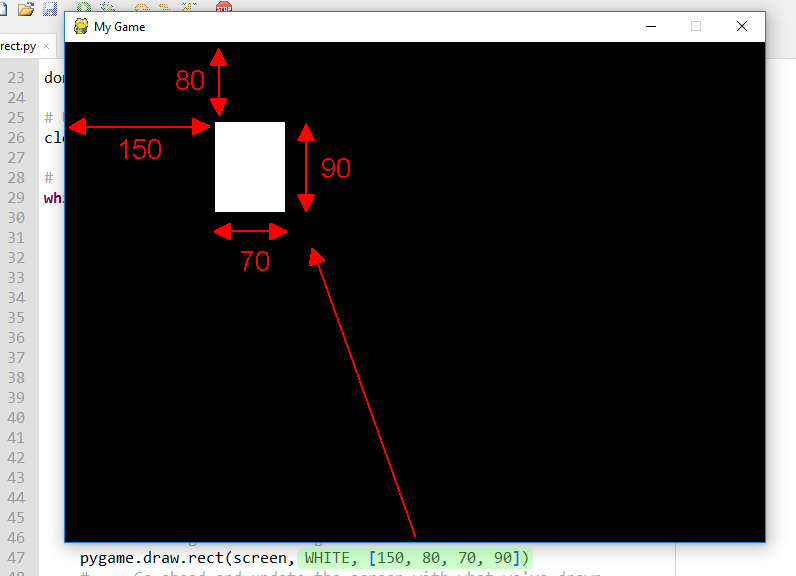
Change the code adding another number before closing the parenthesis like this :
pygame.draw.rect(screen, WHITE, [50, 50, 50, 50], 7)
pygame.draw.circle(screen, RED, [200, 140], 30, 5)
For now comment the line which draws the circle (use a # in front of the line) and leave the rectangle fully filled.
pygame.draw.rect(screen, WHITE, [50, 50, 50, 50])
# pygame.draw.circle(screen, RED, [200, 140], 30, 5)
If you have problems you can download the code from here and test it.
Chapter 6.2 - Move on
6.2 - Move on
This screen that we have created is updated 60 times per second with the command clock.tick(60) but because we don't change anything it is the same picture 60 times a second.
Now we are going to move the rectangle. How can we do this? Which of the for numbers [50, 50, 50, 50] is the position of the rectangle? If you don't remember go to the previous page and look at the picture.
We are going to replace the numbers with variables. Replace the draw command with these eight lines.
rect_x = 50 # X starting position of rectangle
rect_y = 50 # Y starting position of rectangle
speed_x = 5 # X speed of rectangle
speed_y = 5 # Y speed of rectangle
pygame.draw.rect(screen, WHITE, [rect_x, rect_y, 50,50])
rect_x += speed_x
rect_y += speed_y
print ("rect_x =", rect_x, "rect_y =", rect_y)
Nothing is happening. Why? Because 60 times per second rect_x and rect_y become 50 and then 55.
What should we do? Put the first four lines outside the loop. Cut and paste them before line 28 (#Main program loop) and don't forget the indentation.
Wow!! A moving rectangle!!
If you haven't managed to do it download the code from here and test it.
Chapter 6.3 - And stay on
6.3 - And stay on
So we managed to make the rectangle to move. Now we are going to control its movement. Download the code from here and open it to Thonny.
Change lines 33 and 34 using different integer numbers (0, 1, 2,...) and every time execute the code. Try with negative numbers (ex -5 or -1).
What happens if speed_x or speed_y is 0? What happens if they are negative?
speed = 0 means that rectangle is not moving
speed > 0 means that rectangle moves to one direction
speed < 0 means that rectangle moves to the other direction
How can we change the direction? Try this in CLI :
>>> number = 5
>>> print (number)
>>> number *= -1
>>> print(number)
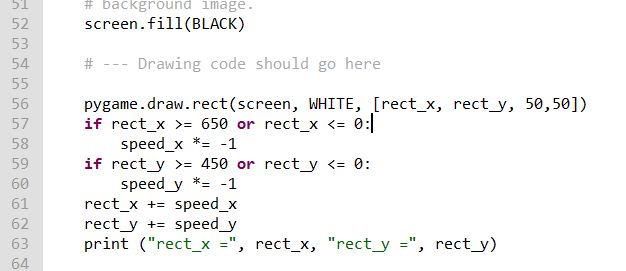
We will add this lines of code to the loop after drawing the rectangle (after line 56) and move the other lines downwards :
if rect_x >= 650 or rect_x <= 0:
        speed_x *= -1
if rect_y >= 450 or rect_y <= 0:
        speed_y *= -1
Or you can get the code from here and study it
Chapter 6.4 - Move as my mouse commands
6.4 - Move as my mouse commands
In the previous chapter we show how we can move a rectangle changing the coordinates of the starting point.
Pygame offers a method for moving objects using the mouse. First of all we must know where the mouse position is. To do so open the file we created to draw a square and a circle from here
Copy the following line to line 46 taking care of indentation. 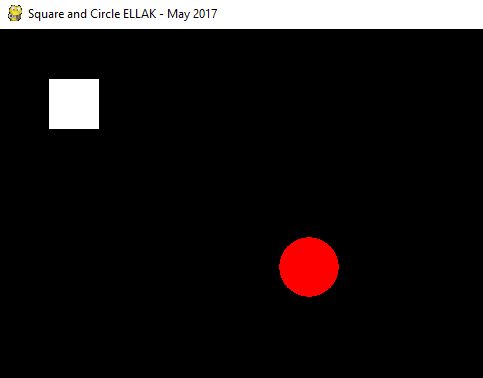
    # Get Mouse Position
     pos = pygame.mouse.get_pos()
    x = pos[0]
    y = pos[1]
    print(x,y)
The first command create a list of two numbers that are the coordinates of the mouse. The following commands assign the x and y coordinates to variables x and y. The print command can be commented out. It exists to view the coordinates as you move the mouse.
Now we will use these coordinates to move the red circle.
Change the line that draws the circle (around line 55) to
pygame.draw.circle(screen, RED, [ x, y], 30, 0)
and run the code
Wow!! Move as i command you.
You can comment the line that prints the position of the mouse (around line 50)
You can download the code from here and test it.
Move the circle near the white square.
Is it on top or the square is on top?
Exercises
- Can you modify the code to have the square on top?
- Can you modify the code to move the square?
Chapter 6.5 - The Stick Figure
6.5 - The Stick Figure
How about creating more complex shapes than a square and a circle? What other command can we use to draw?
Look at the image below. Start from the basic Pygame Template (you can download it from here, open it and rename it to stick) and write the drawing commands to create a stick figure.
Some colors are missing, so you have to create them (at same the positions as the other colors). You can view an RGB calculator here

You can download the code from here.
Chapter 6.6 - Moving the Stick Figure
6.6 - Moving the Stick Figure
Download the code for the Stick Figure from here and open it to Thonny.
We will use the mouse to move the Stick Figure.
Uncomment lines 52 to 55 to read the position of the mouse.
Run the code and you should see the position of the mouse printed in Shell.
Change lines 65 to 79 to add movement to the drawings.
    # Draw stick figure
     # Head
     pygame.draw.circle(screen, BLACK, [100 + x, 100 + y], 15)

    # Body
     pygame.draw.line(screen, ORANGE, [100 + x, 115 + y], [100 + x , 180 + y], 5)


    # Legs
     pygame.draw.line(screen, BLUE, [100 + x , 180 + y ], [80 + x, 250 + y], 5)
    pygame.draw.line(screen, BLUE, [100 + x, 180 + y], [120 + x, 250 + y], 5)

    # Arms
     pygame.draw.line(screen, RED, [100 + x, 125 + y], [50 + x, 140 + y], 5)
    pygame.draw.line(screen, RED, [100 + x, 125 + y], [150 + x, 140 + y], 5)
Don't forget to check the indentation.
You can download the code from here to test it