Module 5 - Section 1 - Graphics
| Site: | ΕΛ/ΛΑΚ Moodle |
| Course: | Python Lab |
| Book: | Module 5 - Section 1 - Graphics |
| Printed by: | Guest user |
| Date: | Tuesday, 9 June 2026, 3:43 AM |
Description
After the completion of this module the students will be able to:
- describe how to draw shapes
- create code to animate a shape
- create code to bounce a shape inside a windows
- reproduce the code to animate and bounce two objects
- organize the code for multiple animation
5.1.1 - Move On
Starting from the pygame basic template the screen that we have created is updated 60 times per second with the command clock.tick(60).
Change the color of the screen to BLACK changing the line 44 to :
screen.fill(BLACK)
To draw a rectangle write the following command in line 47 (don't forget the correct indentation).
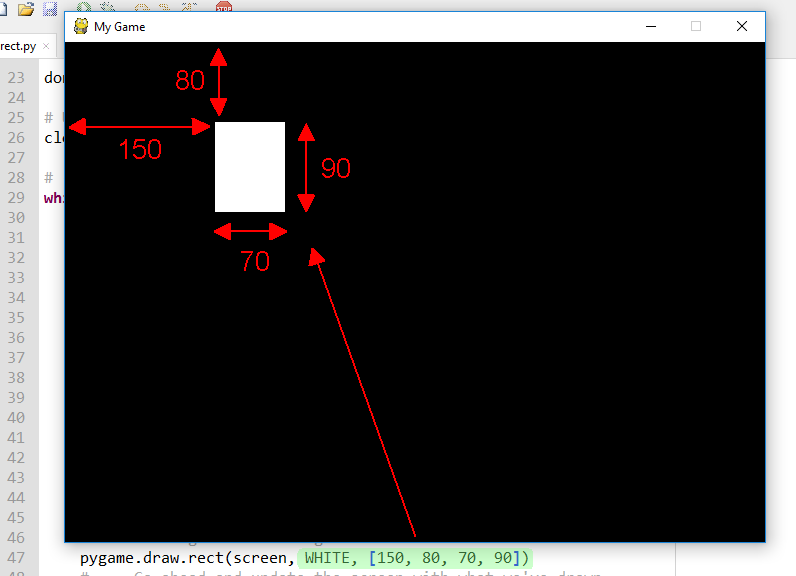
pygame.draw.rect(screen,WHITE, [50, 50, 50, 50])
The screen is still refreshing at a rate of 60 frames per second but we cannot see it because the rectangle is always at the same position.
Now we are going to move the rectangle. How can we do this? Which of the four numbers [50, 50, 50, 50] is the starting position of the rectangle? If you don't remember look at the picture below and rethink.
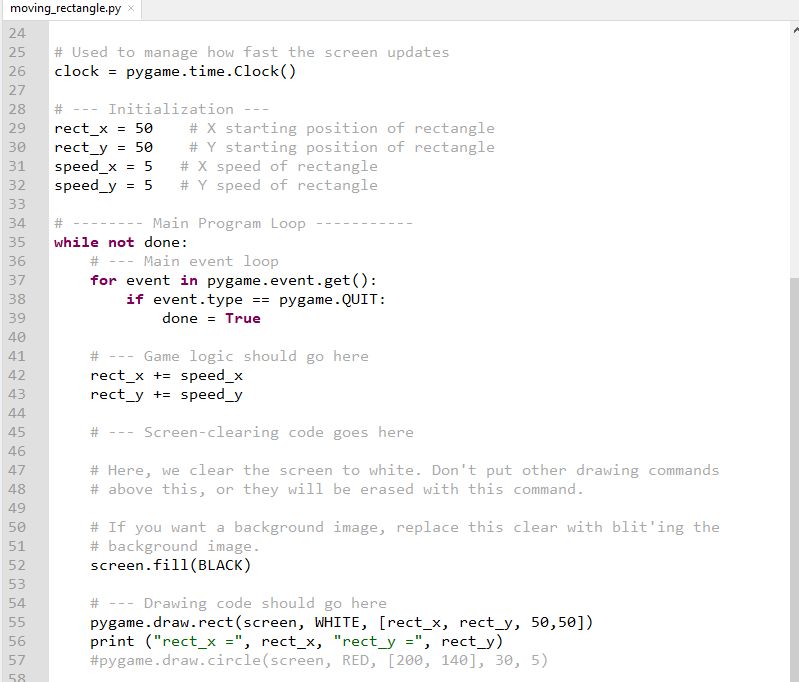
First of all we are going to replace the constant numbers with variables, then replace the draw command in line 47 with these eight lines. (don't forget the correct identation)
rect_x = 50 # X starting position of rectangle
rect_y = 50 # Y starting position of rectangle
speed_x = 5 # X speed of rectangle
speed_y = 5 # Y speed of rectangle
pygame.draw.rect(screen, WHITE, [rect_x, rect_y, 50,50])
rect_x += speed_x
rect_y += speed_y
print ("rect_x =", rect_x, "rect_y =", rect_y)
Nothing is happening. Why? Because 60 times per second rect_x and rect_y become 50 and then 55. Check the CLI area to see where is the starting point of the rectangle. The print command is used to inform us for the position of the rectangle. When we succeed in moving the rectangle we can comment or delete this line of code.
What should we do?
- First : create an initialization block of commands outside the Main program loop and move the first four commands there, taking care of indentation.
- Second : move the next two commands in the Game logic block (it is not necessary but it is better to put commands in the right place, so it is easier to make changes and fix errors).
If you made a mistake that you cannot fix you can download the finished code from here.
Wow!! A moving rectangle!!
Wow!! The rectagle after a while vanishes outside the screen....
Look at the CLI to understand what happened to the rectangle. To stop and Reset Thonny press the ![]() button
button
5.1.2 - And stay on
We managed to animate the rectangle. Now we are going to control its movement. If you haven't done it you can download the code from here and open it to Thonny.
Change lines 42 and 43 using different integer numbers (0, 1, 2,...) and execute the code after each change you make. Also try using negative numbers (ex -5 or -1).
What happens if speed_x or speed_y variables are 0? What happens if they are negative?
speed = 0 means that rectangle is not moving
speed > 0 means that rectangle moves to one direction (right or down)
speed < 0 means that rectangle moves to the other direction (left or up)
How can we change the direction of the rectangle? Try this in CLI :
>>> number = 5
>>> print (number)
>>> number *= -1
>>> print (number)
What do you think is the purpose of third command?
How do you think that we can change the direction of the cube when it reaches the edge of the screen?

We will add this lines of code to the loop inside the block of gaming logic after setting the speed of the cube.
if rect_x >= 650 or rect_x <= 0:
        speed_x *= -1
if rect_y >= 450 or rect_y <= 0:
        speed_y *= -1
If you haven't managed to complete the code or you have an error you can download it from here.
Try to figure out why te numbers that we use for right bounce is 650 and not 700. The same for bottom bounce. Why are we using 450 and not 500. Change the number 650 to 670 kai 450 to 470 and run the program again.
5.1.3 - Multiple objects
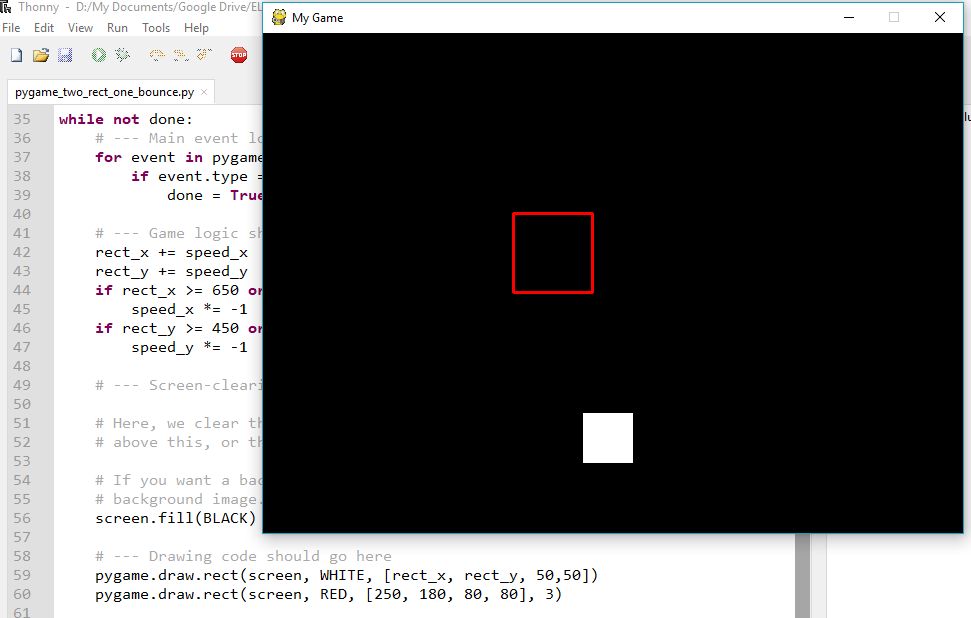
Things are starting to get very interesting. If we wanted to have another RED rectangle inside our graphics screen what should we do?
Let's review the steps again.
Draw the rectangle in the position that we want (ex. 250, 180), with the size that we want (ex. 80,80) and if we want just the frame, use another parameter for the thickness (ex. 3)
pygame.draw.rect(screen, RED, [250, 180, 80, 80], 3)
Copy the command after the moving white rectangle drawing command.
If you haven't managed to write the correct code you can download it from here
Which of the two shapes is in the front? Why? Can you change the code so the other shape is in the front.
Also remember that you can change the game speed in line 66 in command
clock.tick(60)
Greater numbers result in greater speed but sometimes the computers graphics system cannot keep up. Change the number to see the difference but do not go over 120.
Also changing the speed of the rectangle in lines 31 and 32 result in smoother movement when we reduce the numbers. Try using speeds 1 to 10.
speed_x = 2 # X speed of rectangle
speed_y = 2 # Y speed of rectangle
5.1.4 - Multiple objects movement
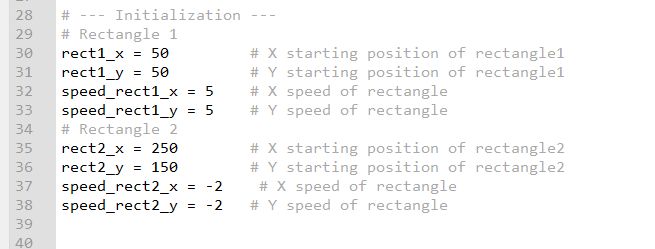
Starting from the previous script, that we have created a white moving rectangle and a red frame, can you add code for the red frame to move and bounce to the edges of the screen?
As you can see the code is starting to be complicated so writing comments and keep the code tidy helps.
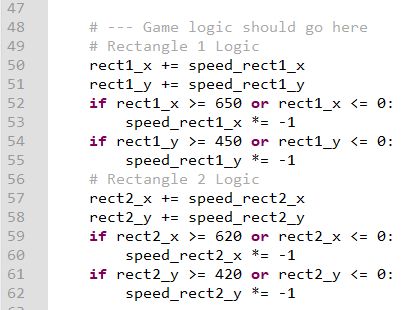

If you have an error in your script you can download the code from here
As you can see we managed to bounce two rectangles but we wrote everything twice (WET) which is against our programming principles: Don't repeat Yourself (DRY).