Module 4 - Section 2 - Graphics
| Site: | ΕΛ/ΛΑΚ Moodle |
| Course: | Python Lab |
| Book: | Module 4 - Section 2 - Graphics |
| Printed by: | Guest user |
| Date: | Tuesday, 21 July 2026, 6:57 PM |
Description
After the completion of this module the students will be able to:
- identify the commands inside the Pygame basic template
- experiment with various graphics commands
- draw shapes using Python commands
- draw text using Python commands
4.2.1 - What is Pygame Library
To make graphics easier to work with, we'll use “Pygame.” Pygame is a library of code that other people have written, and makes it simple to:
- Draw graphic shapes
- Display bitmapped images
- Animate
- Interact with keyboard, mouse, and gamepad
- Play sound
- Detect when objects collide
The first code a Pygame program needs to do is load and initialize the Pygame library. Every program that uses Pygame should start with these lines:
# Import a library of functions called 'pygame'
>>> import pygame
Pygame library should be installed to your Thonny python environment. If you get an error running the previous command then pygame is not installed. Read the installation instructions and install it.
Important: The import pygame command looks for a library file named pygame. If a programmer creates a new program named pygame.py, the computer will import that file instead! This will prevent any pygame programs from working until that pygame.py file is deleted. Never name a program pygame.
After import we have to initialize the pygame with the next command.
# Initialize the game engine
>>> pygame.init()
4.2.2 - Graphics colors
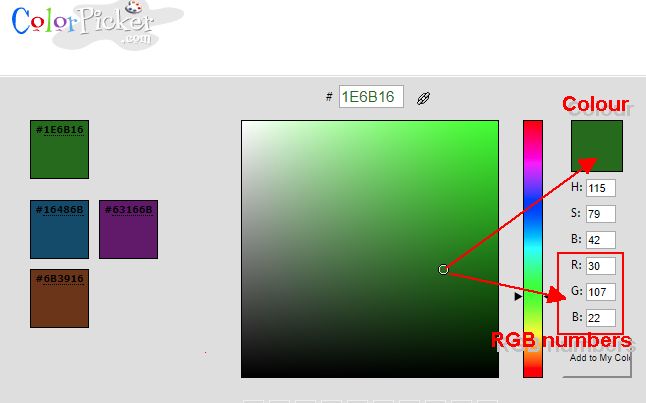
Colors are defined in a list of three colors: Red, Green, and Blue. Have you ever heard of an RGB monitor?
Each element of the RGB triad is a number ranging from 0 to 255. Zero means there is none of the color, and 255 tells the monitor to display as much of the color as possible. The colors combine in an additive way, so if all three colors are specified, the color on the monitor appears white.
Color in Python is defined by a tuple which is a kind of a list of three numbers. Individual numbers in the tuple are separated by commas. Write the following command in CLI area to create colors.
>>> BLACK = ( 0, 0, 0)
>>> WHITE = ( 255, 255, 255)
>>> RED = ( 255, 0, 0)
>>> GREEN = ( 0, 255, 0)
>>> BLUE = ( 0, 0, 255)
For these variable names we use CAPITAL letters. These variables that are not changing during the execution of the programm are called constants and we use upper-case letter to name them.
I f you want to create a color and you don't know the combination of the three colors you can go to color picker web page and experiment.
4.2.3 - Windows
So far, the programs that wrote created only printed text to the CLI area. Those programs did not open any windows like most modern programs do. The code to open a window is not complex. Below is the required code, which creates a window sized to a width of 700 pixels, and a height of 500:
Opening and setting the window size :
>>> size = (700, 500) # Size can also be either a tuple or a list. Which do you think is better?
>>> screen = pygame.display.set_mode(size)
With the second command pygame is not opening a window but it is setting the parameters (size) of the window. Size is also a list of two numbers.
We can also set the title of the window with the command :
>>> pygame.display.set_caption("My Game")
4.2.4 - User interaction and event processing
With just the code written so far, the program would create a window and immediately hang. The user can't interact with the window, even to close it. All of this interaction needs to be programmed. Code needs to be added so that the program waits in a loop until the user clicks “exit.”
This is the most complex part of the program, and a complete understanding of it isn't needed yet. But it is necessary to have an idea of what it does, so spend some time studying it and asking questions.

As you can see in lines 11-13 the script checks if the user clicked QUIT. If this event is TRUE then variable done becomes TRUE and the scripts gets out of the loop terminating the program.
There are many other events that we can process :
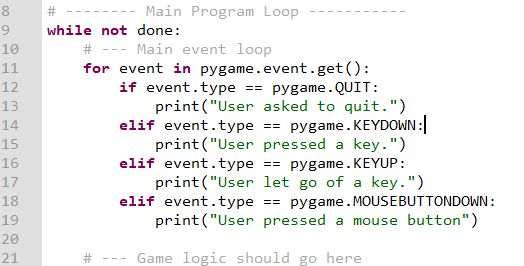
The events (like pressing keys) all go together in a list. The program uses a for loop to loop through each event. Using a chain of if statements, the script figures out what type of event occurred. The code to handle that event goes in the if statement.
All the if statements should go together, in one for loop. A common mistake when doing copy and pasting code is to not merge loops from two programs, but to have two event loops.
4.2.5 - Frame processing and ending
The Main loop
The basic logic and order for each frame of the game:
- While not done:
- For each event (keypress, mouse click, etc.):
- Use a chain of if statements to run code to handle each event.
- Run calculations to determine where objects move, what happens when objects collide, etc.
- Clear the screen
- Draw everything
It makes the program easier to read and understand if these steps aren't mixed togther.
Frames Per Second (FPS)
The code for drawing the image to the screen happens inside the while loop.
With the clock tick set at 10, the contents of the window will be drawn 10 times per second. If we need animation this is very slow.
If the clock tick is more than the computer can handle then computer will not be able to process everything in time because all of its time is spent updating the screen.
Ending
Right now, clicking the “close” button of a window while running this Pygame program in IDLE will still cause the program to crash. This is a hassle because it requires a lot of clicking to close a crashed program.
The problem is, even though the loop has exited, the program hasn't told the computer to close the window. By calling the command below, the program will close any open windows and exit as desired.
pygame.quit()
Fortunately Thonny has a ![]() button in case that we forgot to terminate the script properly.
button in case that we forgot to terminate the script properly.
Clearing the Screen
screen.fill(WHITE)
Flipping the Screen
Very important! You must flip the display after you draw. The computer will not display the graphics as you draw them because it would cause the screen to flicker. This waits to display the screen until the program has finished drawing. The command below “flips” the graphics to the screen.
Failure to include this command will mean the program just shows a blank screen. Any drawing code after this flip will not display.
pygame.display.flip()
4.2.6 - Pygame revisited
The basic template for the pygame code follows. Click on the link below, copy the contents of the file to Thonny and save it as pygame_basic (or with whatever name you like).
So what is all of the commands? Let's review again all the commands.
import pygame # it imports the library pygame
Colors are not known to Python, so we create them using Red Green and Blue (RGB) numbers from 0 to 255.
pygame.init() # starts the pygame
size = (700,500) # Set the width and height of the screen
screen = pygame.display.set_mode(size) # creates a window and name it screen
pygame.display.set_caption("My Game") # This is the name on the top of the window
done = False # We create a variable that is called done and when this variable turns to True, during the game, the game stops.
clock = pygame.time.Clock() # It controls the refresh rate
The three following commands wait for user interaction (event). QUIT is when we press the X button on the top of the window. Then variable done changes to True and the script continues out of the loop
for event in pygame.event.get():
if event.type == pygame.QUIT:
done = True
screen.fill(WHITE) # background is WHITE. Try to change it to other defined colors.
pygame.display.flip() # update the screen
clock.tick(60) # refresh 60 times a second
After the script continues out of the loop we are closing pygame (if we don't then we have a zombie !!!! windows and we have to close it using the stop button)
pygame.quit() # Close the window and quit.
In case you want to review what the commands are doing it this template you can view the following video :
4.2.7 - Graphics
Open the Basic Pygame Template file (click here if you haven't saved it).
Around line 43 there is a command to fill the background with WHITE color. Change this line so the background is BLACK and run the code to see the difference. (you should change the line to screen.fill(BLACK) )
Now between in lines 45 and 47 we will write code to create a WHITE rectangle.
In line 46 write
pygame.draw.rect(screen, WHITE, [50, 50, 50, 50])
Do not forget to correct the identation if needed.
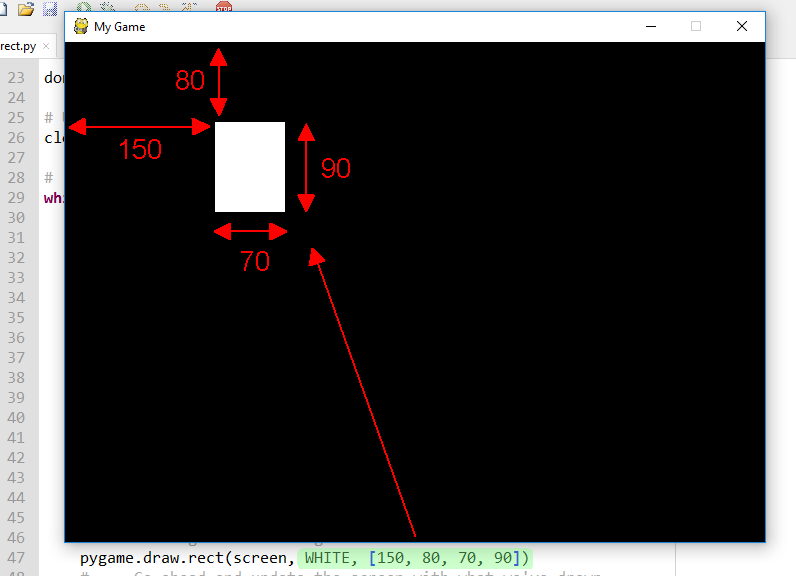
Pygame is the library, draw is a method, rect (for rectangle) is a type, screen is where to draw.
The first two numbers are the top left coordinates and the second two numbers are the width and height of the rectangle. You can experiment changing these numbers (consider that your screen is 700 x 500) and the color to one of the previously defined. In the image below the command is pygame.draw.rect(screen, WHITE, [150, 80, 70, 90])
You can view what other shapes you can draw here
Try to draw another shape. This time draw a circle writing the code under the line that creates the rectangle.
If you didn't succeed in finding the command on your own, try the following line :
pygame.draw.circle(screen, RED, [200, 140], 30)
[200, 140] is the center of the circle and 30 its radious.
Change the code adding another number before closing the parenthesis like this :
pygame.draw.rect(screen, WHITE, [50, 50, 50, 50], 7)
pygame.draw.circle(screen, RED, [200, 140], 30, 5)
What do you think the last numbers do?
4.2.8 - Drawing Text
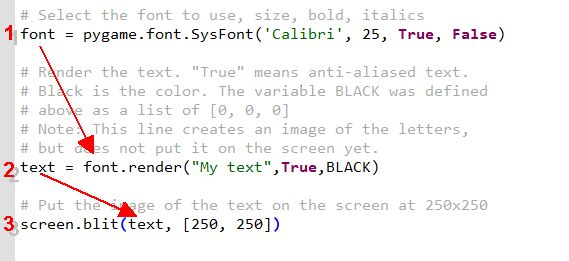
- First, create a variable that holds information about the font to be used, such as what typeface and how big.
font = SysFont(name, size, bold=False, italic=False) - Second, create an image of the text. One way to think of it is that the program carves out a “stamp” with the required letters that is ready to be dipped in ink and stamped on the paper.
text = font.render(text, antialias, color, background=None)
- Tthird, write where this image of the text should be stamped (or “blit'ed”) to the screen.
screen.blit(text, [250, 250])
Starting from the pygame basic template write the commands inside the drawing section:
font = pygame.font.SysFont('Calibri', 25, True, False) # in line 47
text = font.render("My text",True,BLACK) # in line 48
screen.blit(text, [250, 250]) # in line 49
and save the script as simple_text.
Experiment combining different shapes and text and creating your own picture.