Module 6 - Section 1 - Loops and Animation
| Site: | ΕΛ/ΛΑΚ Moodle |
| Course: | Python Lab |
| Book: | Module 6 - Section 1 - Loops and Animation |
| Printed by: | Επισκέπτης (Guest user) |
| Date: | Tuesday, 27 January 2026, 2:57 AM |
6.1.1 - A snowflake
We already know how to draw an object and animate it by changing its position. We managed to animate more than one objects but in the code we have used, many commands were repeated and our code turned to be complicated. What if we wanted to create more than 3 objects. Let's try to create 50 snowflakes in random position inside our screen.
Download the snowflakes template pygame file, save it in your projects folder and open it using Thonny.
Remember that random is a library so we have to import before using it. At the beginning of the script under the import pygame command (line 7) write:
import random
If the background is WHITE change it to BLACK otherwise we would not see the WHITE snowflakes on WHITE background.
Now you can use the random function to create snowflakes. The snowflakes will be white circles of radius of 2. So the command to draw one of them, in a random position, inside our screen is:
x = random.randrange(10, 690)
y = random.randrange(10, 490)
pygame.draw.circle(screen, WHITE, [x,y] , 2)
But where is the correct position of these three commands and why we haven't used randrange(0,700) and (0,500) for the two commands?
You can try to copy and paste the three lines around line 49 and test what is the result.

With this implementation, every time the main loop is executed, the variables x and y are reinitialized. We don't want this, so we have to take the first two command outside the main loop. Around line 29 write a comment:
# --- Initialization of variables
move the first two commands there, taking care of indentation, and rerun the script. Now we have one snowflake in a random position inside our screen.
If you haven't managed to create a working script download it from here and save it inside your project's folder as snow_flakes_1
6.1.2 - List of pairs
As we already know the position of the snowflake is a list of two numbers. If we want to draw 50 snow flakes we need 50 pairs of numbers. How can we create 50 pairs at once. Using a for loop. And where we can store them? In a list of course.
Create a new script in Thonny and save it as snowList (or whatever you like) inside your project's folder.
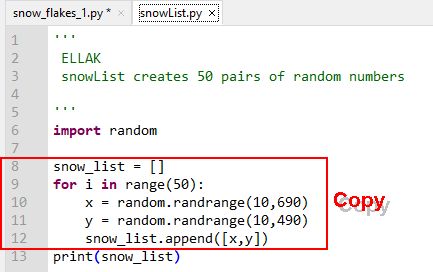
In the script area of Thonny write, or copy and paste the following commands:
import random
snow_list = []
for i in range(50):
    x = random.randrange(10,690)
    y = random.randrange(10,490)
    snow_list.append([x,y])
print(snow_list)
Run the script. Every time it creates a list of 50 pairs of numbers which we are going to use as coordinates for our snowflakes.
How can we access the items of the list?
Try this in CLI area:
>>> print(snow_list[0])
or even
>>> snow_list[4]
How can we use these pairs to draw snowflakes?
If you haven't managed to create the script you can download it from here and save it inside your project's folder as snowList
6.1.3 - Two scripts in one IDE
Without closing the scipt that creates the 50 pairs of coordinates (snowList) open the script that you wrote to create one random snowflake.
If you haven't managed to draw one random snowflake you can download the script from here. Open it in Thonny and save it as snow_flakes_1 in your project's folder.
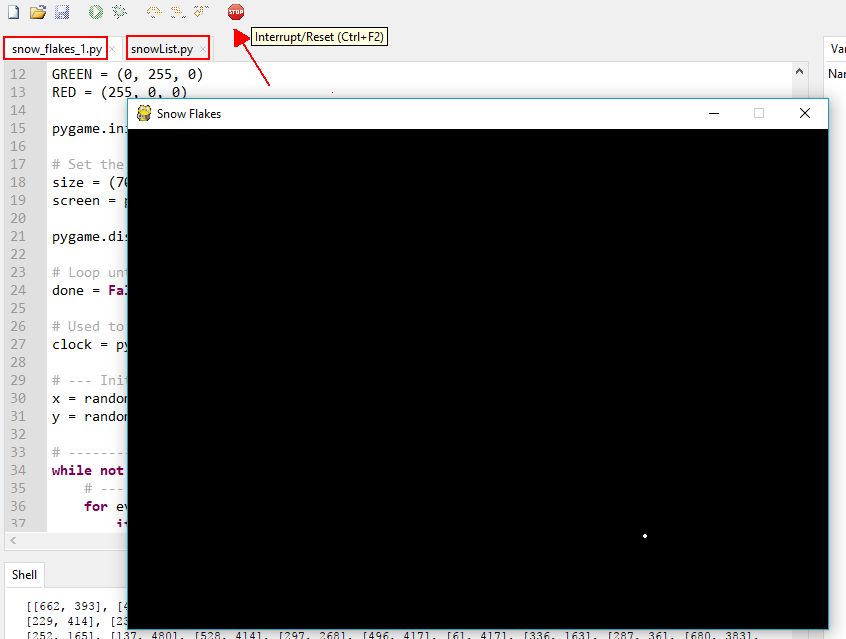
In Thonny IDE we can have more than one scripts open (but only one running everytime). If one script is running we have to interrupt it to switch to the other.

Try to run the first script, then close it and run the second. When the graphics script is running the play button is fainted and Thonny cannot run other scripts. Remember that in pygame template there is a main loop that is always running unless we click the QUIT button. This is not the case with snowList script because it automatically terminates, after creating the list.
6.1.4 - One of many snowflakes
If you don't have snow_flakes_1 and snowList opened inside Thonny, find them inside your project's folder and open them. In case that you don't have them you can download them from here and here and save them inside your project's folder.
In the snow_flakes_1 script remove lines 30 and 31 from initialization area that were used to create a random pair for the one snowflake.
Copy the commands lines 8 to 12 from snowList script and paste them inside snow_flakes_1 script in the initialization area, around line 30 (outside the main loop).


Save the script as snow_flakes_1a
If you run the script it creates one snowflake on the coordinates of the last pair of the list. Why?
What if we wanted the snowflake to be drawn on the coordinates of the first pair?
How can we view the coordinates of one of the pairs?
Stop the snow_flakes_1a script and in the CLI area write
>>> snow_list[0]
or
>>> snow_list[1]
Now change the draw command around line 59 to
pygame.draw.circle(screen, WHITE, snow_list[0], 2)
With this change every time the script runs it creates 50 pairs of coordinates and uses the first pair to draw one snow flake.
What change we should make to draw all the 50 snowflakes;
6.1.5 - Many snowflakes
To draw all the snowflakes, we have to create a loop inside the drawing section.
Save the script as snow_flakes_50 inside your project's folder
If you haven't managed to create the script download it from here and save it inside your project's folder as snow_flakes_50
We will change the drawing command with these two commands (taking care of indentation):

for i in range(50):
        pygame.draw.circle(screen, WHITE, snow_list[i] , 2)
This loop will run 50 times and everytime will draw a snowflake, the first, the second, the third and so on.
And what if we wanted to draw 100 snowflakes? What changes we have to do?
Can we change the code so we can make only one change and not two?
Do you remember the len function? Write the following command inside CLI area:
>>> len (snow_list)
Change the for loop inside the drawing are to this:
for i in range(len(snow_list)):
Now you can create as many snowflakes as you like changing only the for loop inside the initialization area.
If you haven't managed to write the script you can download it from here.
Can you change the script to ask the user how many snow flakes he wants to be drawn?
6.1.6 - It's snowing once
Starting from the script that creates 50 snow flakes open it inside Thonny and save it as snow_flakes_drop_once. If you don't have it you can download it from here.
For every pair inside the snow_list list a snow flake appears in the specified by the pair coordinates. The first number of the pair is coordinate X (pixels from the left margin) and the second number of the pair is coordinate Y (pixels from the top margin).
Which of these two number we must change to move the snow flake down?
Change the code after the drawing area, taking care of identation, to this:
for i in range(len(snow_list)):
        if i == 20:
            pygame.draw.circle(screen, RED, snow_list[i] , 2)
            print (snow_list[i])
        else:
            pygame.draw.circle(screen, WHITE, snow_list[i] , 2)
What is the purpose of this code? What does this code print in CLI area?
Stop the script pressing the ![]() button and in the CLI area write:
button and in the CLI area write:
>>> print(snow_list[20])
>>> print(snow_list[20][0])
>>> print(snow_list[20][1])
What are these numbers?
Which of these numbers and how must we change to move the snow flake down?
Change the code after the drawing area, taking care of identation, to this:
for i in range(len(snow_list)):
        if i == 20:
            pygame.draw.circle(screen, RED, snow_list[i] , 2)
            print (snow_list[i])
            snow_list[i][1] += 1
        else:
            pygame.draw.circle(screen, WHITE, snow_list[i] , 2)
Change the code to have every snowflake dropping.
Why we have used a list instead of tuples for the coordinates of the snow flakes?
6.1.7 - It's snowing for ever
The problem with the previous code is that the snow dissapears at the bottom of the screen when coordinate Y is greater than 500.
Can you think of a way to move the snowflakes from the bottom to the top of the screen when dissapear?
Starting from the script that creates the animated snow flakes open it inside Thonny and save it as snow_flakes_drop_all. If you don't have it you can download it from here and save it in your project's folder.
We need a condition to check if coordinate Y is greater than 500 (or 502 to be sure that the snowflake completely dissapeared). And then, change coordinate Y so it is redrawn on top of the screen (coordinate Y is less than 0). This is one way to do things but it is better to reinitialize both X and Y coordinates to random values. In this way the snow flakes appear random and not in the same X coordinate.
The commands that we have to add are:
if snow_list[i][1] > 502:
snow_list[i][0] = random.randrange(10,690)
snow_list[i][1] = random.randrange(-50,-20)
Think where you should write them. After succeding, change the negative numbers to positive to see the difference.

The complete script (with minor) changes can be downloaded from here.
6.1.8 - Wind bursts
Next thing to do to create a realistic snow drop is to implement wind bursts. We will use our keyboard right and left buttons to blow the snowflakes.
Inside the main while loop of the program, we need to add some items to our event processing loop. In addition to looking for a pygame.QUIT event, the program needs to look for keyboard events. An event is generated each time the user presses a key.
A pygame.KEYDOWN event is generated when a key is pressed down. A pygame.KEYUP event is generated when the user lets up on a key. When the user presses the left key we will change the position of the the snowflake moving it to the left and moving it to the right when the user presses the right key.
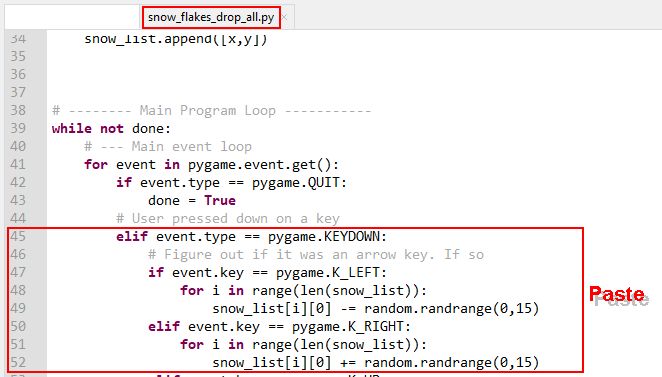
The code that you have to copy to the main event loop is :
elif event.type == pygame.KEYDOWN:
    # Figure out if it was an arrow key. If so
    if event.key == pygame.K_LEFT:
        for i in range(len(snow_list)):
            snow_list[i][0] -= random.randrange(0,15)
    elif event.key == pygame.K_RIGHT:
        for i in range(len(snow_list)):
            snow_list[i][0] += random.randrange(0,15)

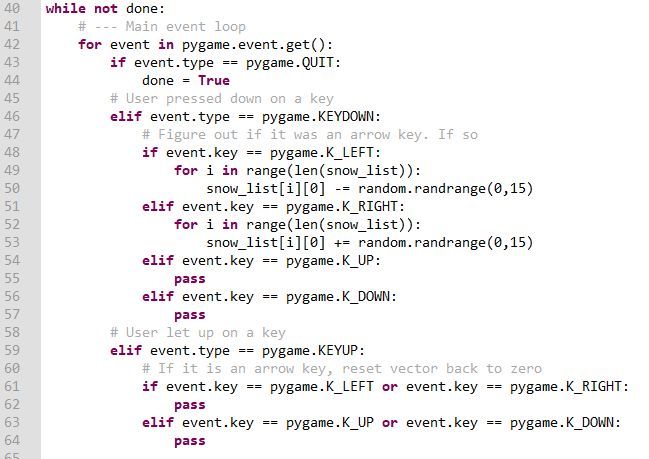
With the above code we check if a key is pressed and after that if the key is LEFT or RIGHT we change the coordinates X of the snowflakes. It is not perfect but it is a start.
If we want to check other key presses or key releases then we can use the following code:

And if we wanted to use other keys there is a complete list of all the keys of the keyboard here.
Multiple key strokes
# --- Game logic should go here
pressed_key = pygame.key.get_pressed()
# Figure out if it was an arrow key. If so
if pressed_key[pygame.K_LEFT]:
for i in range(len(snow_list)):
snow_list[i][0] -= random.randrange(0,15)
if pressed_key[pygame.K_RIGHT]:
for i in range(len(snow_list)):
snow_list[i][0] += random.randrange(0,15)