Submodule 11.2: The Color in Gimp
| Site: | ΕΛ/ΛΑΚ Moodle |
| Course: | Web Design and Digital Content Production |
| Book: | Submodule 11.2: The Color in Gimp |
| Printed by: | Επισκέπτης (Guest user) |
| Date: | Sunday, 24 May 2026, 6:21 PM |
Description
- The RGB color model
- The HSV color model
- Color picker - Color selectors
The RGB color model
We have already studied the RGB and RGBA models.
In the next module, we will learn how to compose an image from its R, G, B components, their channels as they are called in Gimp. Note that in Gimp the Red, Green, Blue channels are grayscaled.
Levels tool
The Level tool can modify the intensity range of the active layer/selection in every channel. This tool is used to change the contrast and make an image lighter or darker.
Let's correct the color cast of an image:
- The histogram shows us how many dark (left) pixels and how many bright pixels (right) are in the image.
- To add more bright pixels in the image, we drag the white slider at the end point of the histogram.
- When we move the black slider to the right we "clip" the dark pixels. The term "clip" means lose color information (although it may not be noticeable).
- We will repeat the same process for the histogram of each channel.
You can find the file of the video at: courseGimp>xcfFiles>image5.xcf
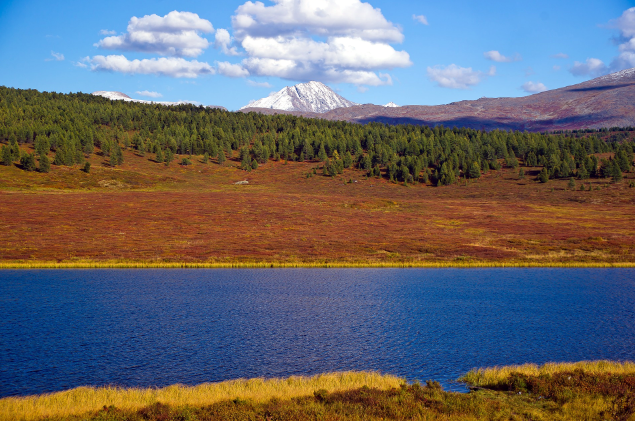
Exercise
- Open the "lake-3046965_1920.jpg" file in the folder "courseGimp>freeImages" with your Gimp and save it as
exersice11.2.01.xcfin the folder "courseGimp>exercises". - Open the "Levels tool".
- Modify and save the file. The new image should be as shown in the following image:
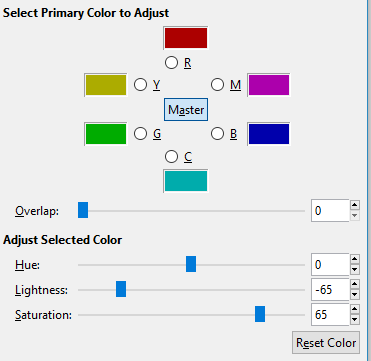
Red channel: black slider = 1, black slider = 225
Green channel: black slider = 19, black slider = 216
Blue channel: black slider = 1, black slider = 226
The HSV color model
The hue (H) of a color is a property which describes how close a color is to a pure color.
Hues can be represented by a number that specifies the position of the corresponding pure color on the color wheel, as a fraction between 0 and 1. Value 0ο refers to red; 60ο to yellow; 120ο to green, and so forth around the color wheel.

Let's change the Hue from 0 to 360:
The saturation (S) of a color describes how white a color is. A pure red is fully saturated, with a saturation of 1; tints of red have saturations less than 1, and white has a saturation of 0.
Let's change the saturation of the red color from 100 to 0:
The value (V) of a color, also called its lightness, describes how dark or white a color is. A value of 0 is black, with increasing lightness moving away from black. A value of 100 is white.
Let's change the value of the red color from 100 to 0 :
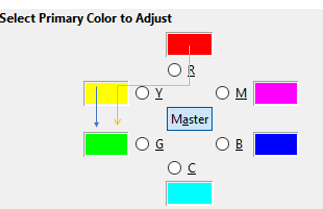
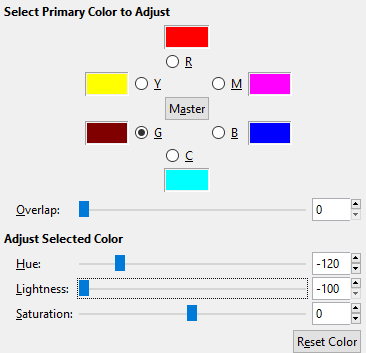
The Hue Saturation Tool
The Hue-Saturation tool is used to adjust hue, saturation and lightness levels on a range of color weights for the selected or active layer.
In the next example, we will change the color of all tree leaves to green.
You can find the file of the video: courseGimp>xcfFiles>image4.xcf
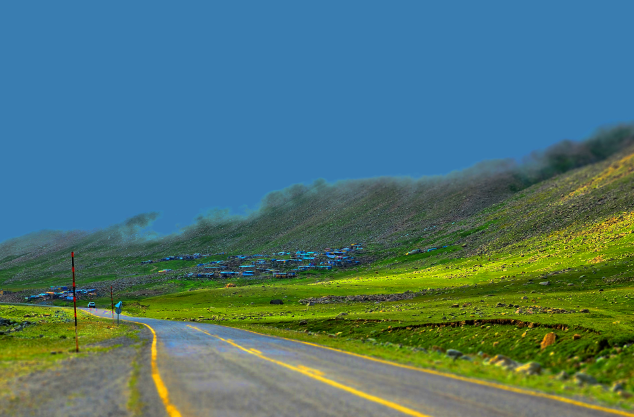
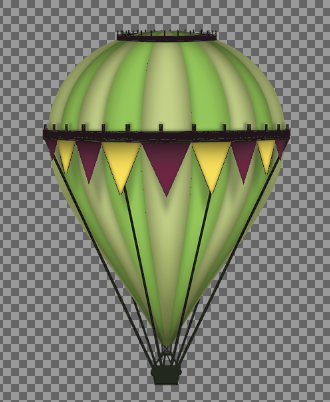
Exercise
- Open the "ballon.png" file in the folder "courseGimp>freeImages" with your Gimp and save it as
exersice11.2.02.xcfin the folder "courseGimp>exercises". - Open the "Hue- Saturation tool".
- Modify and save the file. The new image should be as shown in the following image:
Color picker- Color selection
Color picker
The Color Picker Tool is used to select any color you want from an image that you have opened on Gimp. To select a color, you just click on the area of the image that contains it and it becomes the active color of the pointer.
Color selection
The Fuzzy Select (Magic Wand) tool is used to select contiguous areas of the current layer/image based on color similarity. While using it, is very important to select the correct starting point.
The Select by Color tool is designed to select areas of an image based on color similarity. It is very similar to Fuzzy Select tool (“Magic Wand”). However, they have one important difference. Select by Color tool, selects any image area that has significant color similarity with the pixel you clicked on, in contrast with the Magic Wand tool which only selects the connected areas.
The Threshold slider determines the range of colors that will be selected when you click on the initial point, before dragging it: the higher the threshold, the larger the color range and thus the selection.
With the selected by option you can choose which of the Red, Green or Blue components of the image GIMP will use to calculate the similarity.
Let's use these tools to change the cloudy sky of the image to blue.
You can find the file of the video: courseGimp>xcfFiles>image60.xcf
Exercise
- Open the "image60.xcf" file in the folder "courseGimp>xcfFiles" with your Gimp and save it as
exersice11.2.03.xcfin the folder "courseGimp>exercises". - Open the "Hue- Saturation tool".
- Modify and save the file. The new, improved image should be as shown in the following image: