Revisiting the first circuit with Arduino
| Site: | ΕΛ/ΛΑΚ Moodle |
| Course: | 3D printing with circuits and Arduino |
| Book: | Revisiting the first circuit with Arduino |
| Printed by: | Guest user |
| Date: | Friday, 26 June 2026, 9:51 PM |
Description
Variables, loops and, in general, more stuff.
1. Arduino schematics
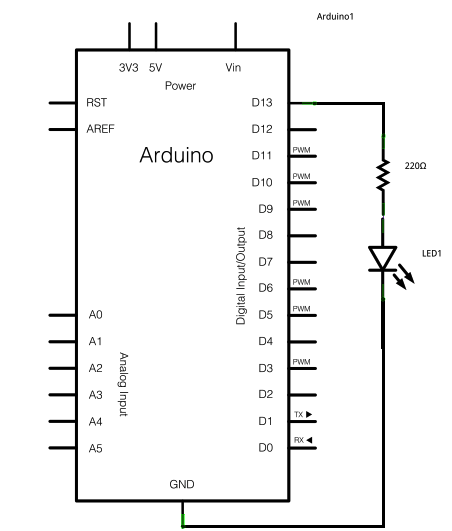
In electronics schematics, we only include the necessary and sufficient information for somebody to understand the circuit. This is why in Arduino schematics for projects, we do not include all the details of the Arduino board.This is the schematic of what we are going to make next:
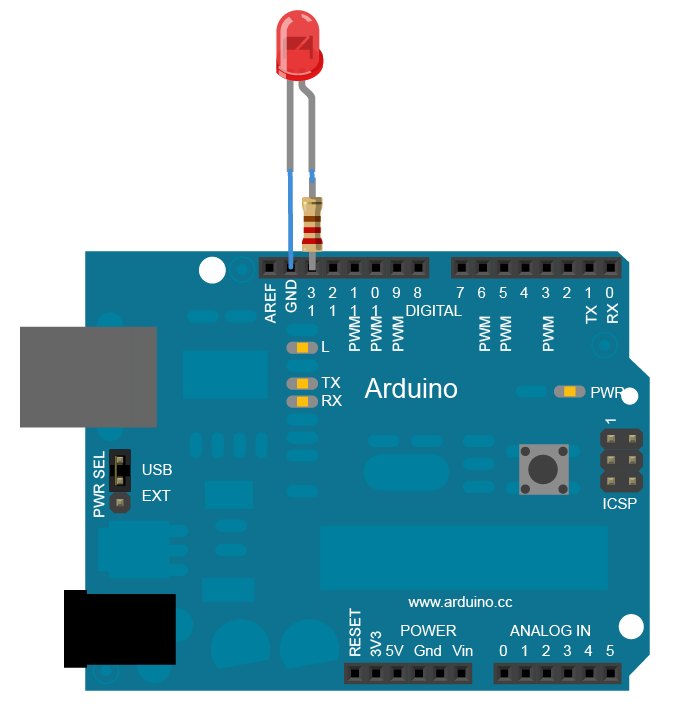
It is the equivalent of this:
It is the same circuit from Electronics crash course, only this time we are controlling a LED with an Arduino. We are also going to use the Blink sketch, only this time with an external LED connected to pin 13.
There are many ways to make these connections with a breadboard. Here is what else you will need:
- LED (red)
- 220 Ohm resistor (red, red, brown, gold)
- Jumper wires
2. Add more LEDs
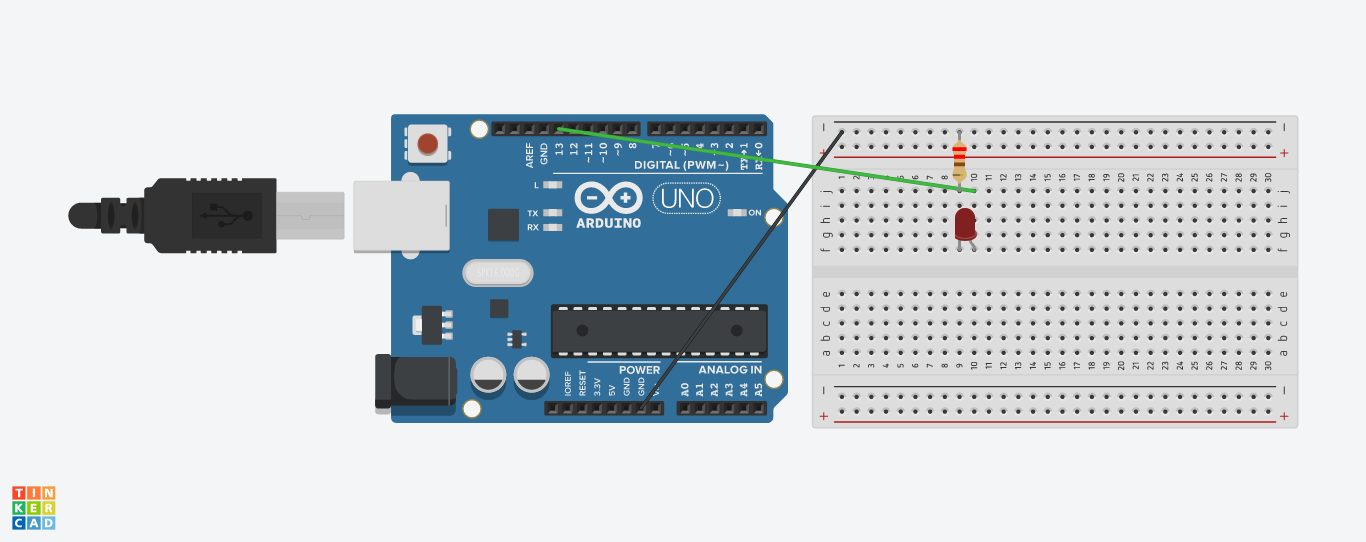
This is a way that works. As we mentioned before, the on-board LED is permanently connected to pin 13, so the code controls any components connected to pin 13 also.
3. Variables
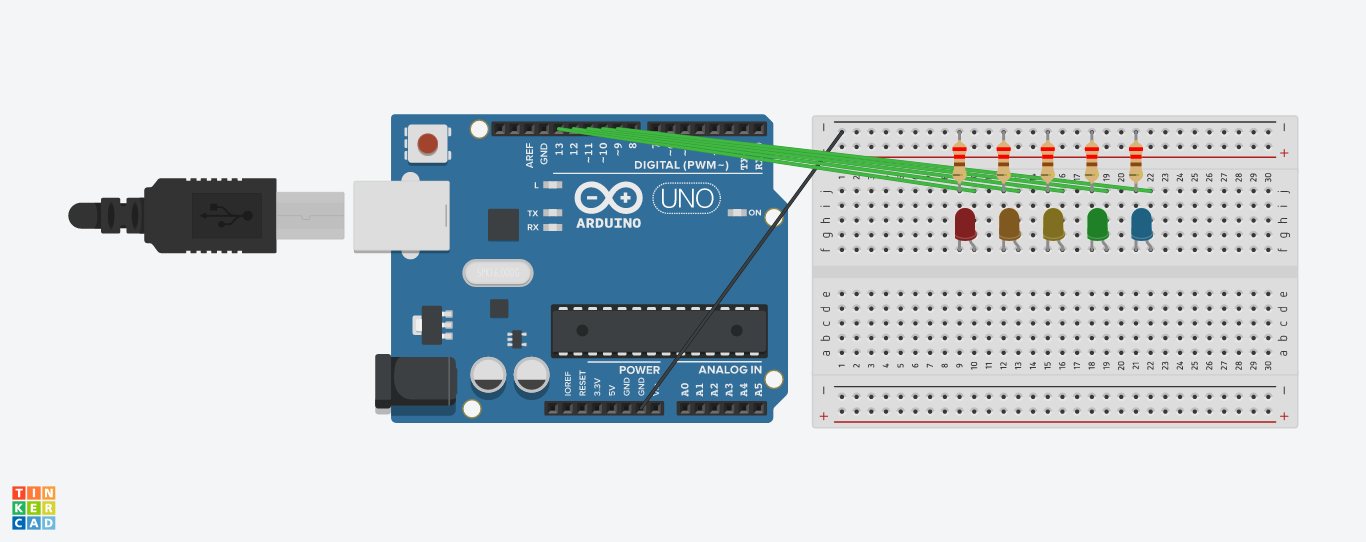
This is an implementation using pins 9-13.
The code used:
void setup()
{
  pinMode(13, OUTPUT);
  pinMode(12, OUTPUT);
  pinMode(11, OUTPUT);
  pinMode(10, OUTPUT);
  pinMode(9, OUTPUT);
}

void loop()
{
  digitalWrite(13, HIGH);
  delay(1000); // Wait for 1000 millisecond(s)
  digitalWrite(13, LOW);
  digitalWrite(12, HIGH);
  delay(1000); // Wait for 1000 millisecond(s)
  digitalWrite(12, LOW);
  digitalWrite(11, HIGH);
  delay(1000); // Wait for 1000 millisecond(s)
  digitalWrite(11, LOW);
  digitalWrite(10, HIGH);
  delay(1000); // Wait for 1000 millisecond(s)
  digitalWrite(10, LOW);
  digitalWrite(9, HIGH);
  delay(1000); // Wait for 1000 millisecond(s)
  digitalWrite(9, LOW);
}
As you can see, this time we mentioned the pin numbers directly and initialised all of them separately as output pins.
Now if we want to change the delay time in this sketch for all the LEDs, it will be quite hard, as the delay() function is used a few times. One way to get passed this is to create a place that we would store the delay time information and every time we call delay() we would use its name.
int delayTime = 1000;This place is called a variable. With the statement above, we are declaring a variable that we named 'delayTime', of type integer and we initialised its value to 1000.
Now we can use it inside a function:
delay(delayTime);Aside from this handy feature, variables have many other advantages, such as changing their value inside the program. We will look more into this later.
One important thing to clarify is that where a variable is declared in the program affects where it can be used and where not.
- If on the top of the program, outside setup() and loop(), the variable is global and can be used everywhere in the program.
- If you want to use it inside a single function, such as setup() or loop() it will be declared there.
4. for() loops
Now it seems that there was a lot of copy-paste involved in this solution. One of the main principles of programming is that we should aim for simple and elegant when it comes to coding.
One way to simplify this iteration of statements is using a for() loop.
The for statement is used to repeat a block of statements enclosed in curly braces. An increment counter is usually used to increment and terminate the loop. The for statement is useful for any repetitive operation, and is often used in combination with arrays to operate on collections of data/pins.
The syntax of the for() loop goes like this:
for (initialization; condition; increment) {
	//statement(s);
}
Inside the for() loop we put statements that we want to be repeated a specific amount of times, conditionally.
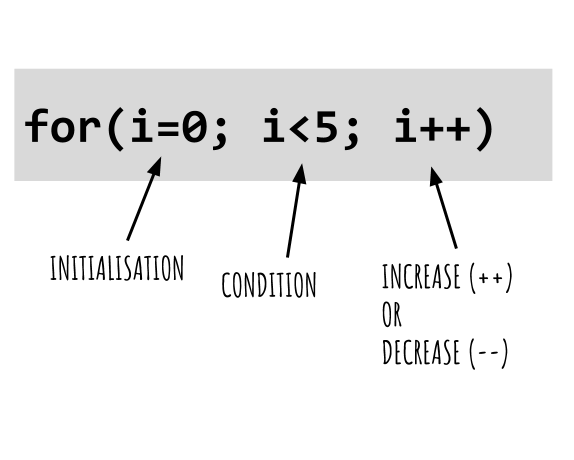
In the example above, whatever would be inside this loop would be repeated 5 times:
- i=0. Since 0<5, run once. Increase i by 1.
- i=1. Since 1<5, run once. Increase i by 1.
- i=2. Since 2<5, run once. Increase i by 1.
- i=3. Since 3<5, run once. Increase i by 1.
- i=4. Since 4<5, run once. Increase i by 1.
- i=5. Exit the loop.
void setup() {
  // use a for loop to set each pin as an output:
  for (int thisPin = 9; thisPin < 14; thisPin++) {
    pinMode(thisPin, OUTPUT);
  }
}
The int tag was used because, instead of mentioning the pins by their number in pinMode, we created a variable that we named thisPin.
Running this code by hand:
- thisPin=9<14, set pin 9 to output and increase by 1
- thisPin=10<14, set pin 10 to output and increase by 1
- thisPin=11<14, set pin 11 to output and increase by 1
- thisPin=12<14, set pin 12 to output and increase by 1
- thisPin=13<14, set pin 13 to output and increase by 1
- thisPin=14, exit loop.
4.1. Flashing elegantly
void setup()
{
  // use a for loop to initialise each pin as an output:
  for (int thisPin = 9; thisPin < 14; thisPin++) {
    pinMode(thisPin, OUTPUT);
  }

}

void loop()
{
  // another for loop to turn a pins ON and OFF
  // this time thiPin is decreasing (--)
  for (int thisPin = 13; thisPin > 8; thisPin--) {
    // turn the pin on:
    digitalWrite(thisPin, HIGH);
    delay(500);
    // turn the pin off:
    digitalWrite(thisPin, LOW);
  }

}