Submodule 23.2: Creating new data - Forms- Practice
| Site: | ΕΛ/ΛΑΚ Moodle |
| Course: | Study / Web Design and Web Development |
| Book: | Submodule 23.2: Creating new data - Forms- Practice |
| Printed by: | Guest user |
| Date: | Saturday, 6 June 2026, 4:06 PM |
Introduction
In this submodule, you will learn to create reactive forms in your Angular application.
While the user writes, the value of the input will be displayed above the form.
When the user submits the form, the values will be displayed in the existing unordered list.
Before you start the submodule, take a look at this page. It has very helpful information.
Update the App module
Import the FormsModule and ReactiveFormsModule from @angular/forms into your app.module.ts and add it to your NgModule's imports array as follows:
import { FormsModule } from '@angular/forms';
import { ReactiveFormsModule } from '@angular/forms';
...
imports: [
 ...
 FormsModule,
 ReactiveFormsModule
 ],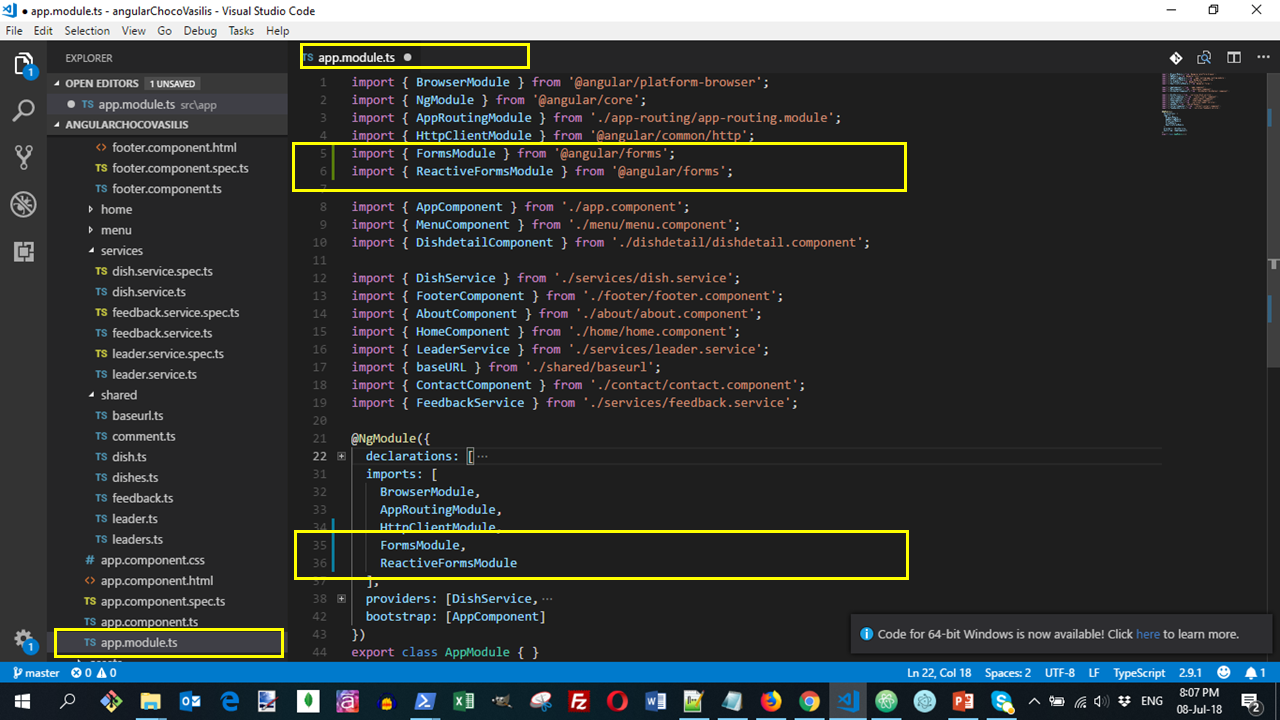
Note that here we imported FormsModule to enable the Template Driven Forms and ReactiveFormsModule to load the reactive forms directives.
It is not necessary to import the FormsModule since we will work only with the ReactiveFormsModule.
Update the "Model"
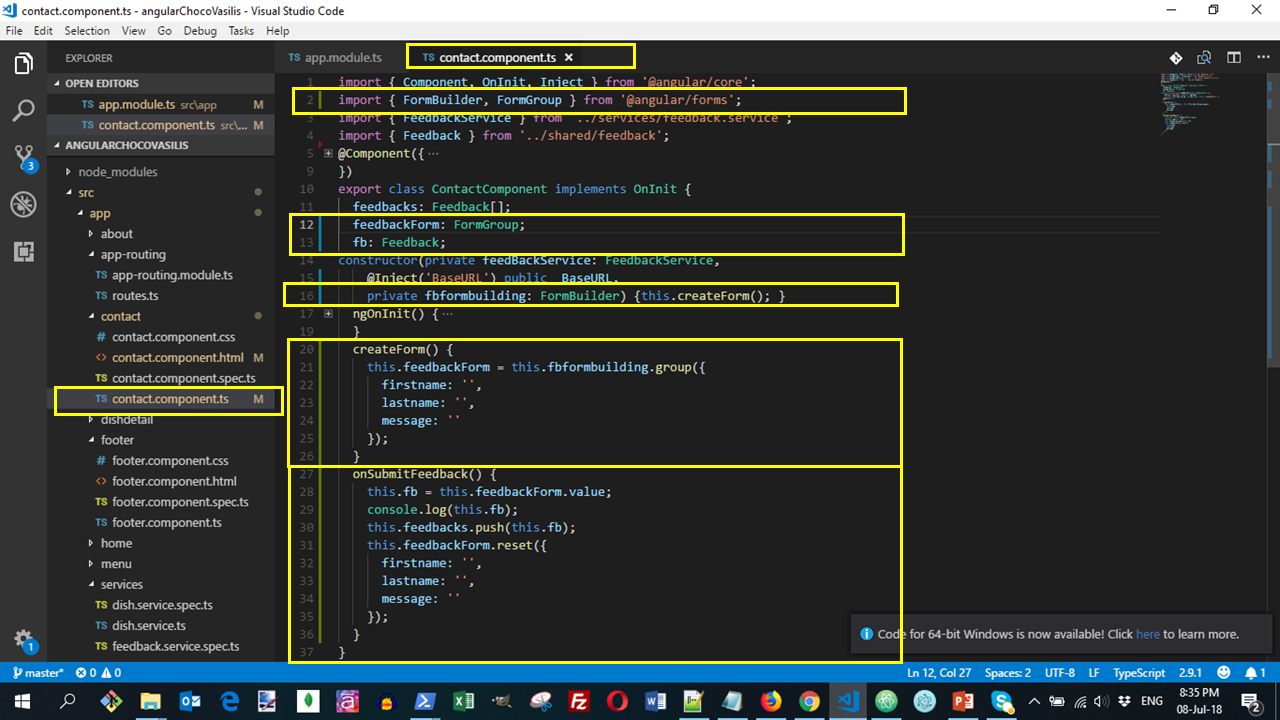
Update the "Model" contact.component.ts file as follows:
import { FormBuilder, FormGroup } from '@angular/forms';
feedbackForm: FormGroup;
fb: Feedback;
 private fbformbuilding: FormBuilder) {this.createForm(); }
 createForm() {
   this.feedbackForm = this.fbformbuilding.group({
   firstname: '',
   lastname: '',
   message: ''
   });
 }
 onSubmitFeedback() {
   this.fb = this.feedbackForm.value;
   console.log(this.fb);
   this.feedbacks.push(this.fb);
   this.feedbackForm.reset({
     firstname: '',
     lastname: '',
     message: ''
   });
 }
Note
- the import of
{ ... FormGroup } from '@angular/forms';and - the property in the component class named
feedbackFormsets the property to an instance of the FormGroup
Using the FormBuilder we will create FormControl instances with the appropriate names firstName, lastName and message. FormBuilder is like a factory that creates FormGroups and FormControls for us.
Note
- the import of
{ FormBuilder ... } from '@angular/forms'; - the injection of FormBuilder into the constructor of the Component :
private fbformbuilding: FormBuilder. The FormBuilder is an injectable service that is provided with the ReactiveFormsModule.
In order to create the feedbackForm model we use the fbformbuilding.group in the createForm() method. This way we create the formControlNames firstName, lastName and message as strings. Note how the fields within the form are the same as the fields within the Feedback class so the form model becomes a lot more straightforward.
The individual form controls are now collected within a group. The FormGroup provides its model value as an object reduced from the values of each control in the group.
The FormGroup also tracks the status and changes of each of its controls, so if one of the control’s status or value changes, the parent control also emits a new status or value change. The model for the group is maintained by its members. In the next page, we will update the template to reflect the model in the view.
The onSubmitFeedback() method
Here we create a method called onSubmitFeedback() which when the user clicks the button, it will take the user's input and display it on the page.
- To do this we apply the user's input taken from the
this.feedbackForm.valueto thethis.fbproperty which is an instance ofFeedbackclass. - Next, we push this information in the
this.feedbacksarray. This feedbacks array is already defined inside the view and already displays the information present in thedb.jsonfile. When we use push, we take the new value added and push it in this array as a newlist-group- itemunder the existing items. - Also, we use reset so that the
feedbackFormvalues will reset to their initial values.
Note that this procedure doesn't communicate with the server. Hence, on reload, the new submitted item will disappear.
Update the "View"
Add in the container of the "template", the contact.component.html, the next code:

Note:
- The Angular
JsonPipe {{ feedbackForm.value | json }}that converts a value into its JSON-format representation. It is useful for debugging. - The
novalidateattribute which as a boolean attribute specifies that the form-data (input) should not be validated when submitted. This is beyond the scope of this course. - The use of the directive
[formGroup]="feedbackForm"to connect the model with the form template. So by doing this, we are tying this reactive form in the template to the corresponding form model in our contact.component.ts file. - The
(ngSubmit)="onSubmitFeedback()"directive that allows us to submit the form by clicking theSend messagebutton. - The use of the directives
formControlName="..."to associate the form controls to the model. Each form control gets a formControlName directive applied so we can register the controls on the outer form.
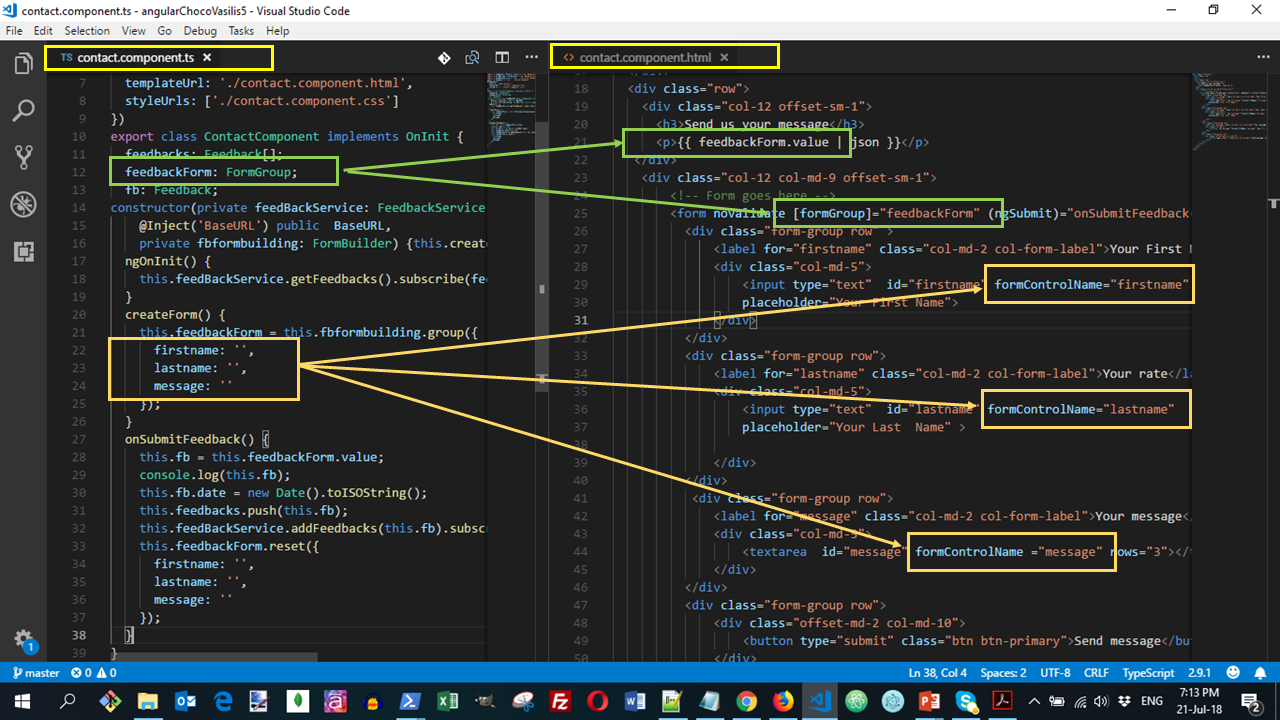
Note that just as the FormGroup contains a group of controls, the feedbackForm FormGroup is bound to the form element with the FormGroup directive, creating a communication layer between the model and the form containing the inputs. The formControlName input provided by the FormControlName directive binds each individual input to the form control defined in the FormGroup. The form controls communicate with their respective elements.
Note that the bootstrap class "form-group" is not the same with the angular directive "FormGroup".
The results
With the previous code configured, open your Terminal, go to the jsonServer sub-folder and run json-server --watch db.json -d 2000. This will introduce a delay of 2 seconds before the server sends the reply for the request. The server will serve the db.json file for your application. You can watch the server in your browser URL localhost:3000
Open another Terminal window, go to the angularChocoYourname angular-sub-folder and run ng serve to run your application in development mode. In your browser navigate to the URL localhost:4200
The contact page has been served by the json-server.
We can render the data in the HTML view but we will lose these if we refresh our browser
In the next submodule, you will save the data to the db.json file.
Do a Git commit with the message "Creating data- Forms".