Submodule 8.1: The HTML of forms
| Site: | ΕΛ/ΛΑΚ Moodle |
| Course: | Study / Web Design and Web Development |
| Book: | Submodule 8.1: The HTML of forms |
| Printed by: | Guest user |
| Date: | Friday, 26 June 2026, 1:49 AM |
Description
- role and creation of a form
- elements
- attributes
- accessibility
Form functionality
When you submit a form the information you have added passes from the browser to the server.
Forms are the "front-end" for the HTTP Client to send information back to the HTTP Server.

- The user fills in a form and submits it
- The browser sends the form data to the server
- The server receives the data, processes it, and sends a response
- The browser displays the response
Form structure
The below code shows the basic structure of a form:
<form action="destination" method="get or post">
   . . . form elements go here . . .
   <input type="submit">
</form>action="destination"this defines the place where the data are going to be sent when the user clicks the submit button.method="get": the information sent to the server will be visible in the uRL fieldmethod="post": the information sent to the server as part of HTTP body; is not visible in the URL. Post is a better choice for keeping secrets<input type="submit">: this defines a submit button (for submitting the form)
For more information: https://www.w3schools.com/html/html_forms.asp
The input element
The <input> element has many roles and hence it is important for form elements.
The <input> element changes its way of displaying according to the value of the type attribute.
Examples
Other elements
Input element is not the only element in forms. Some examples of other elements are:
Examples
How can I see the entries of a submitted form?
Complete the form in the following file:
Check the file's console.log. You can see the results of the submission.
We have used some JavaScript code to grab and display the results instead of using a WEB Server!
Form input attributes
The name attribute
Each input field must have a name attribute in order for its value to be submitted.
The information in fields that do not have a name attribute is not passed when submitting a form.
So, the simplest input would be:
<input type="text" name="firstname"/>Other attributes
autofocus: will display the "focus" of the cursor to that field when the page loads. Typically, we chose to bring focus to the first input field of the form,
<input type="text" name="firstname" autofocus="autofocus"/>value: specifies the initial value for an input field,
<input type="text" name="firstname" value="Vasilis"/>size: specifies the size (in characters) for the input field,
<input type="text" name="firstname" value="Vasilis" size="50"/>placeholder: a sample value or a short description of the information that we want our user to fill,
<input type="text" name="firstname" placeholder="Your name goes here"/>minlength: specifies the minimum allowed length for the input field,
<input type="text" name="firstname" placeholder="Your name goes here" minlength="5"/> required: specifies that an input field must be filled out before submitting the form,
<input type="text" name="firstname" placeholder="Your name goes here" minlength="10" required/>
You may have noticed that at first sight, some of these attributes seem to have the same functionality. However, in the next submodule, we will learn how each of these different from one another and why we need all of them.
For more information: https://www.w3schools.com/html/html_form_attributes.asp
Accessibility: Label Element
Labels are important for accessible forms.
When you add a label you don't see any change in the HTML page. It is not easy to understand its function by looking the HTML output.
The importance of label elements lays in the fact that they enable us to use markup to create more accessible/ user-friendly form fields.
In practice, this means that we combine text with input fields, and thus if the user clicks on the title of an input field, the page will automatically navigate to this field.
Labels - Why?
- Associates the text wtih
inputelements - Helps with screen readers!
- Helps with both "clicks" and touch screens!
Labels - How?
idvalue attribute for form input- label element for input label
- for attribute in label to link label element with input via the value of id
<label for="firstname">First name:</label>
<input type="text" name="firstname" id="firstname" placeholder="Your name goes here" minlength="10" required/>
Grouping Form Data
The <fieldset> element is used to group related data in a form. When is used, it draws a box around these elements.
The <legend> element is used to define a caption for the <fieldset> element.
<fieldset>
   <legend>
       Please, fill in the following information:
    </legend>
    <label for="firstname">First name:</label>
       <input type="text" name="firstname" id="firstname"
          placeholder="Your name goes here"
          size="20" autofocus="autofocus" required/> <br><br>
    <label for="secretword">Your password:</label>
       <input type="password" name="secretword" id="secretword"
          placeholder="Your password goes here"
          size="20" required/><br><br>
 </fieldset>
Exersice
Exercise
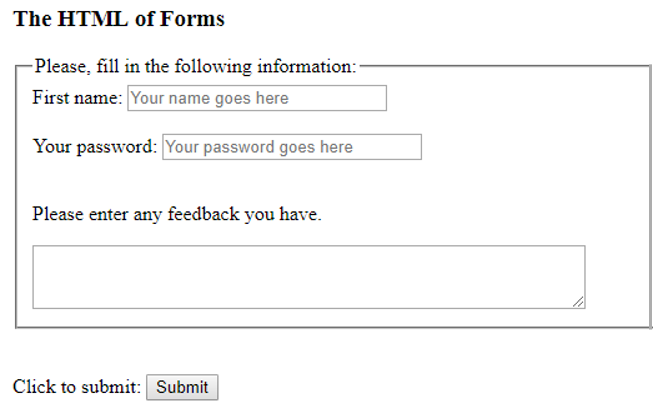
- Open your editor, create a new file and save it as
exersice08.1.htmlin the folder "yourNameWEB2JS". - Copy the appropriate code (form- input text- input password- textarea- fieldset) and paste it in the new file.
- Modify and save the file. The browser's output should be as shown in the following image: