Submodule 14.2: DOM methods/properties and DOM Recursion
| Site: | ΕΛ/ΛΑΚ Moodle |
| Course: | Study / Web Design and Web Development |
| Book: | Submodule 14.2: DOM methods/properties and DOM Recursion |
| Printed by: | Guest user |
| Date: | Tuesday, 26 May 2026, 11:24 PM |
Introduction to DOM methods and properties
DOM methods are actions that can be performed on DOM objects.
DOM properties are the values of the objects that can be added or changed.
Examples of actions we can do are to create new elements, add attributes, changes the content of an HTML element etc.
<p class="example">Hello</p>
document.getElementsByClassName("example")[0].innerHTML = "Hello DOM!";
In the above example, the getElementsByClassName() is the method, whereas the innerHTML is the property.
You have already see the innerHTML property in action on Submodule 6.1: The model of event-driven programming and Submodule 6.3: Applying the "if" statements.
It is important to note that using this property we cannot add new content to content that already exists since the Javascript clears out whatever might already be inside the element.
On the The HTML DOM Element Object page, you can see a list of the different DOM methods and properties.
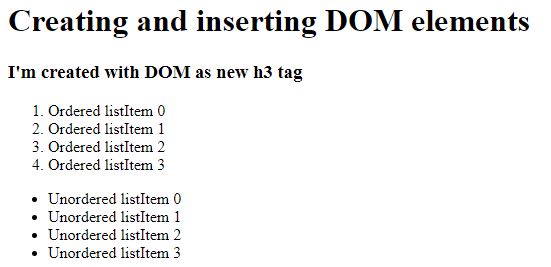
Creating and inserting DOM elements
Here we will see how we can use some of the DOM methods and properties to create a new Node and then attach it to the appropriate place.
DOM provides us with 3 different ways of creating new Nodes:
document.createElement()document.createTextNode()document.createAttribute()
In order to attach the Node created on the appropriate place or remove an existing one, we can use:
element.appendChild()element.insertBefore()element.removeChild()element.replaceChild()element.setAttributeNode()
Let's see an example where we use what we learned above to add a list item in the next HTML page.

Exercise
- Open your editor, create a new file and save it as
exersice14.2.2.htmlin the folder "yourNameWEB2JS". - Copy the code below and paste it in the new file.
- Open the file in your browser to see the results.
- Uncomment the script tag to see the results.
- Uncomment the style tag to see the results.
- Modify the above code to add an h3 tag after the h1 tag.
Recursion
Recursion, in simple words, is a function which calls itself.
The theoretical concept of recursion is complex and you can learn more about it on the JavaScript tutorial: Recursion page.
It is generally used when the same method is needed multiple times in order to get the output that you want.
For example, if we want to walk across the entire DOM and do something with each node, we actually need to do the same thing multiple times. In this case, recursion is a great way to achieve what we want. Let's see that in practice.
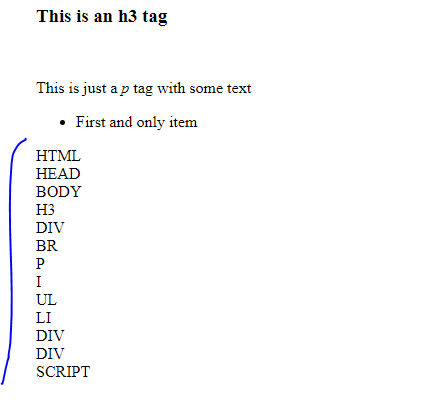
If we had the html code :
 <!DOCTYPE html><html>
<head></head>
<body>    <h3>This is an h3 tag</h3>    <div id="divTag"></div>    <br />    <p id="pTag">This is just a <i>p</i> tag with some text</p>    <ul>        <li> First and only item </li>    </ul>    <div>        <div id="output"></div>    </div></body>
</html>
We can use the concept of recursion to traverse the document and output all the names of the Nodes. The code to achieve this is: <script> window.onload = function () {
var outEl = document.getElementById("output"); var str = ''; function traverse(el) {
str += el.nodeName + "<br>";
for (var i = 0; i < el.children.length; i++) { traverse(el.children[i]); }
}
traverse(document.documentElement); outEl.innerHTML = str;
} </script> In the above code, the traverse function calls itself inside the for loop. If we didn't use recursion here and just had a for loop, the output would have been only the first node element ( HTML). The result of the above code will be :