Day 1 - Section 1 - Getting to know Edison
Day 1 - Section 1 - Getting to know Edison
After the completion of this section the students will be able to:
- use the hardware elements of Edison robot
- communicate with the robot
- create their own programs
- make the robot blink its LEDs
- use the Edison cable to download their programs
- program their robot using barcodes
Chapter 1.4 - Blink A LED
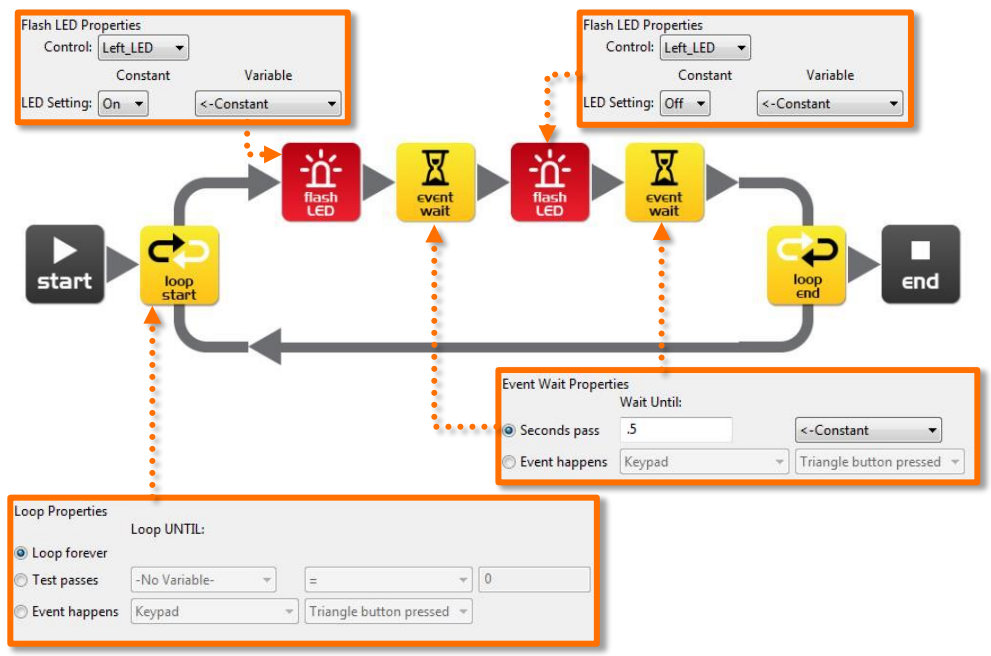
Simple loop program to make the left LED flash.
The traditional first program to write is to make a LED light flash. This is a very simple program and as the name suggests turns on and off the left LED light. Drag across the icons to form the program below, then click on each icon and set the properties box as shown.

How the program works
Edison’s microcontroller (brain) follows each icon as a step and the arrows show the direction of the steps. Let’s follow the steps in the program above.
Step 1: the program begins at the start icon
Step 2: the program follows the arrow out of the top of the loop icon
Step 3: the LED is set to on by the flash LED icon
Step 4: the program waits for 0.5 seconds by the event wait icon (keep the LED on)
Step 5: the LED is set to off by the flash LED icon
Step 6: the program waits for 0.5 seconds by the event wait icon (keep the LED off)
Step 7: what happens here is very important! Rather than following the arrow to the right of the loop end icon, the program moves out of the bottom of the icon and goes back to the loop start icon. This happens because the loop icon is set to ‘Loop forever’. The program therefore once again goes to the first flash LED icon and turns on the LED and then follows the same sequence outlined above. This will continue forever or at least until the batteries go flat!