Book
Revisiting the first circuit with Arduino
Revisiting the first circuit with Arduino
Completion requirements
View
Variables, loops and, in general, more stuff.
4. for() loops
Now it seems that there was a lot of copy-paste involved in this solution. One of the main principles of programming is that we should aim for simple and elegant when it comes to coding.
One way to simplify this iteration of statements is using a for() loop.
The for statement is used to repeat a block of statements enclosed in curly braces. An increment counter is usually used to increment and terminate the loop. The for statement is useful for any repetitive operation, and is often used in combination with arrays to operate on collections of data/pins.
The syntax of the for() loop goes like this:
for (initialization; condition; increment) {
	//statement(s);
}
Inside the for() loop we put statements that we want to be repeated a specific amount of times, conditionally.
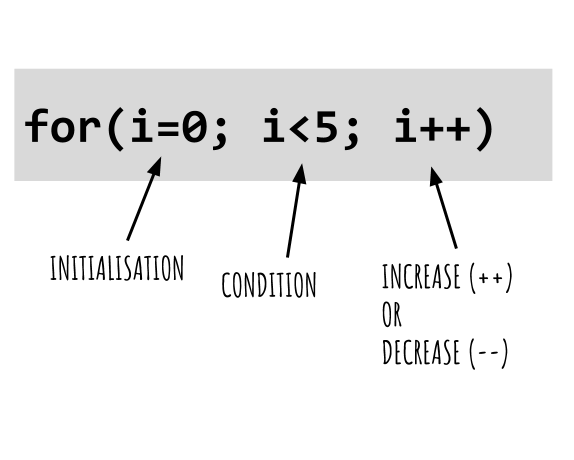
In the example above, whatever would be inside this loop would be repeated 5 times:
- i=0. Since 0<5, run once. Increase i by 1.
- i=1. Since 1<5, run once. Increase i by 1.
- i=2. Since 2<5, run once. Increase i by 1.
- i=3. Since 3<5, run once. Increase i by 1.
- i=4. Since 4<5, run once. Increase i by 1.
- i=5. Exit the loop.
Let's now use a for() loop to set the pins we are using for the LEDs as output. Inside the setup() function we put a for() loop:
void setup() {
  // use a for loop to set each pin as an output:
  for (int thisPin = 9; thisPin < 14; thisPin++) {
    pinMode(thisPin, OUTPUT);
  }
}
The int tag was used because, instead of mentioning the pins by their number in pinMode, we created a variable that we named thisPin.
Running this code by hand:
- thisPin=9<14, set pin 9 to output and increase by 1
- thisPin=10<14, set pin 10 to output and increase by 1
- thisPin=11<14, set pin 11 to output and increase by 1
- thisPin=12<14, set pin 12 to output and increase by 1
- thisPin=13<14, set pin 13 to output and increase by 1
- thisPin=14, exit loop.
Now try making a for() loop for the blink iteration in loop()!